Last round!:)
Thank YOU for your patience!!
A neat FYI at the bottom:)
Okies.... we still have our images up:)
I am switching my glitter to the red one for the last
three tulips:)
Open in animation shop and copy and paste each frame to
PSP if you haven't done so already:)
On all images:
Layers>New Raster Layer Selections>Load From Disk
find your selections folder and click on 2tulips.sel and
click on open.
(hey bemy, where's the pics??)
oh.....i am seeing if you are catching on! :)
refer back to the last page for pics:)
Lighten the dark yellow tulip by flood filling with white.
Click 3 times in it to fill.
Layers>Merge>Merge Visable File>Save.
~~adding the glitter~~
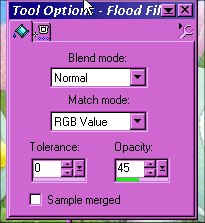
Changing the pattern fill options to this:
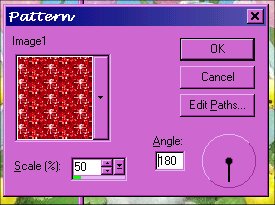
your flood fill tool should still be selected.
use these settings for flood fill:
Working with the first image now:
Change Your Pattern Fill to the first frame of your
glitter.
Click on the inside of both selected tulips to flood fill.
Go to the second frame:
Change your pattern fill to the second frame of your
glitter, same settings.
Click on the inside of both selected tulips to flood fill.
Go to the third frame:
Change your pattern fill to the third frame of your
glitter, same settings.
Click on the inside of both selected tulips to flood fill.

On each image:
Selections>Select None Layers>Merge>Merge All
Flatten File>Save ok....words only!!
on each image:
Layers>New Raster Layer Selections>Load From Disk
Choose 3tulips.sel choose the opacity of your flood fill
that you wish.
choose the angle and size of your pattern fill that you
wish.
Working with the first image now:
Change Your Pattern Fill to the first frame of your
glitter.
Click on the inside of the selected tulip to flood fill.
Go to the second frame:
Change your pattern fill to the second frame of your
glitter, same settings.
Click on the inside of the selected tulip to flood fill.
Go to the third frame:
Change your pattern fill to the third frame of your
glitter, same settings.
Click on the inside of the selected tulip to flood fill.
Selections>Select None Layers>Merge>Merge All
Flatten File>Save Open animation shop, click the
animaition wizard button 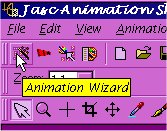 . .
follow the steps like before:)
Ta-Da! you did it!
oh.....you thought i was done, didn't ya? ::grins::
Tip Time!!
check this out.
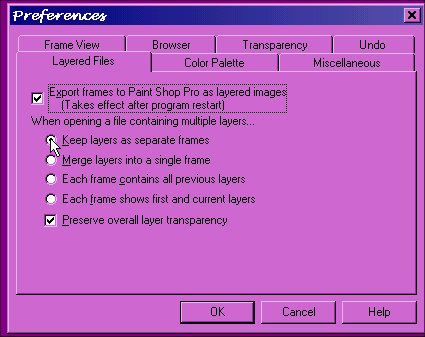
First make sure your Animation Shop preferences are set
like this:
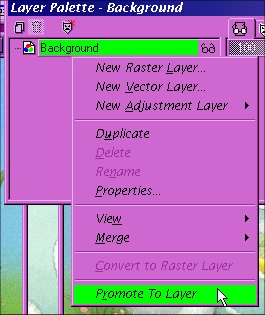
with all your images open in PSP (again) LOL click on the
top bar of image 1 to select it. go to your layers
pallet and right click over the seleced layer and choose:
promote to layer.
click on the top bar of the second image and then click
the copy button click the top bar of the first image and
right click choose=paste as new layer.
go to Layers>Arrange>Send to Bottom.
click on the top bar of the third image and click the
copy button.
click on the top bar of the first image and right click
and choose=paste as new layer.
go to Layers>Arrange>Send to Bottom.
File>Save (it should still be saved in psp format.)
Go to Animation shop File>Open choose the first image
that you just added layers to and click open.
woohoooo! it all opens as an animation in there!
File>Save As i named mine as easter.gif make sure you
save in .gif format!
ok, this might be confusing... i sure was when i
first did it!
Giving Credit Where Credit is due!!
i learned that nifty idea from here:
RD-Tumbling_Sigtag
http://www.riverdancerdesigns.com/tumbling_sigtag/RD-Tumbling_Sigtag.html
©Bemymind@aol.com Later in April, 2002 For Specific
Questions Please feel free to e-mail me!
~~~~~~
|| Back to
Page 1 || Back to
Page 2 ||
|